Bodi Empowerment
Posture //
How to Master Posture Corrector Exercises

Achieving great posture is a challenging feat, and while some individuals may naturally attain it, most people can only maintain this ideal position for brief periods before reverting to habitual postures. Fortunately, improving your posture with posture corrector exercises is possible.
Advanced Posture Exercises For Your Rounded Upper Back
By consistently practising specific posture corrector exercises, individuals of all levels of posture proficiency can make significant improvements. These exercises serve as a proactive approach to enhancing and maintaining better posture over time.
Wall Posture Test
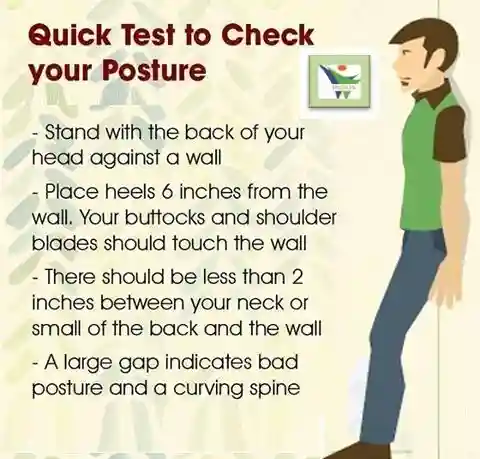
Wall Posture Test: Stand with your back to the wall with your feet 6 inches or 15 cm away from the back of your foot.
Look straight ahead, don’t look up or down. Your head, shoulder blades and buttocks should touch the wall.
There are two sets of exercises depending on the results of your wall test. The results are that:
- Anterior Head Carriage: You can’t touch your head to the wall without tilting your head backwards
- Hyperlordosis: You feel a large hollow in your lower back. If you put your palm against the wall behind your lower back, your back muscles should be just touching your hand. People with hyperlordosis will feel a much larger gap between the wall and their hands.
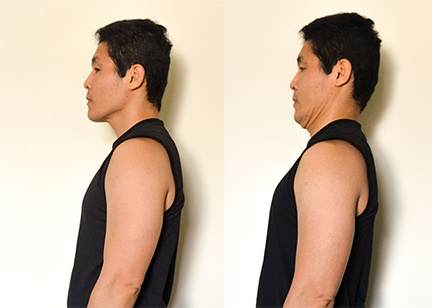
Exercises For People That Can’t Touch Their Head To the Wall: (Anterior Head Carriage)
I find a lot of people try to bring their heads backwards by tilting their heads back. If you cannot touch your head against the wall or are unwittingly cheating by tilting your head back then do the following exercises.
#1 Double Chin Exercise: Posture Corrector Exercise
- Move the head slowly backwards until it is pulled back as far as it will go and keep it in this position for 4 seconds.
- Pretend your head is on rails like a train on a railroad. You don’t tilt your head up or down you just slide backwards.
- You should see a double chin in the mirror.
- Do this 4 sets of 10 every day especially if you sit all day.
The chin tuck exercise is highly beneficial as it not only strengthens the muscles at the front of the neck but also provides a gentle stretch to the muscles at the back of the neck. Additionally, individuals dealing with disc herniations and bulges in the cervical spine, and the vertebrae of the neck, can find relief through the consistent practice of these exercises. This dual action of strengthening and stretching contributes to improved neck health and can be particularly advantageous for those experiencing specific cervical spine issues.
Relieve Mid-Back Discomfort: Top Exercises for a Healthier Mid-Thoracic Spine
#2 Advanced Stretch Of The Upper Back Ligaments (thoracic vertebral ligaments)
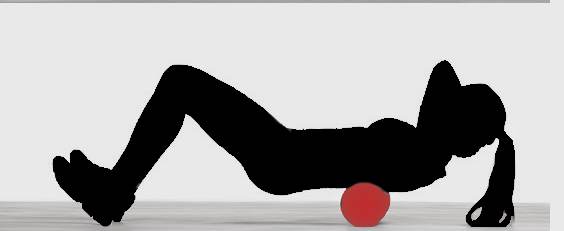
The Foam Roll Static Extension for the mid-back is a beneficial exercise that combines the use of a foam roller with a static extension to promote flexibility and relieve tension in the thoracic spine. Here’s a step-by-step guide to perform this exercise:
Starting Position:
- Begin by placing a foam roller horizontally on the ground.
- Sit in front of the foam roller with your knees bent and feet flat on the floor.
- Position the foam roller at the base of your mid-back, right where your thoracic spine begins.
Execution:
- Lie back on the foam roller so that it supports your mid-back. Ensure your head is comfortably resting on the foam roller.
- Extend your arms straight out to the sides or place your hands behind your head for support, depending on your comfort level.
- Allow your mid-back to gently arch over the foam roller, creating a mild extension in the thoracic spine.
- Keep your hips on the ground and avoid overarching the lower back.
Hold the Stretch:
Hold the extended position for 30 seconds to 1 minute, focusing on deep breathing to enhance relaxation. Eventually, you may be able to hold the position for 5 minutes.
- Feel the gentle stretch in your mid-back as the foam roller provides support and traction.
Release:
Slowly roll off the foam roller, returning to a seated position.
Repeat:
Repeat the Foam Roll Static Extension for 2-3 sets, adjusting the duration based on your comfort level.
Tips:
- Customize the intensity by repositioning the foam roller to target specific areas of the mid-back.
- Focus on maintaining a relaxed neck and shoulders during the stretch.
- If you experience discomfort or pain, modify the intensity or consult with a healthcare professional.
Applying pressure to the mid-back while simultaneously countering this force serves a dual purpose. Not only does this action help relax and loosen up the muscles in the mid-back, but it also alleviates pressure on the discs caused by prolonged forward pressure during extended periods of sitting. By reducing these pressures, the upper back can gradually assume a more “normal” position, allowing the head to move backwards. This progressive adjustment sets the stage for moving towards achieving improved posture over time.
Exercises For Hyperlordosis
#1 Child Pose: Stretch for your lower back muscles: Posture Corrector Exercise
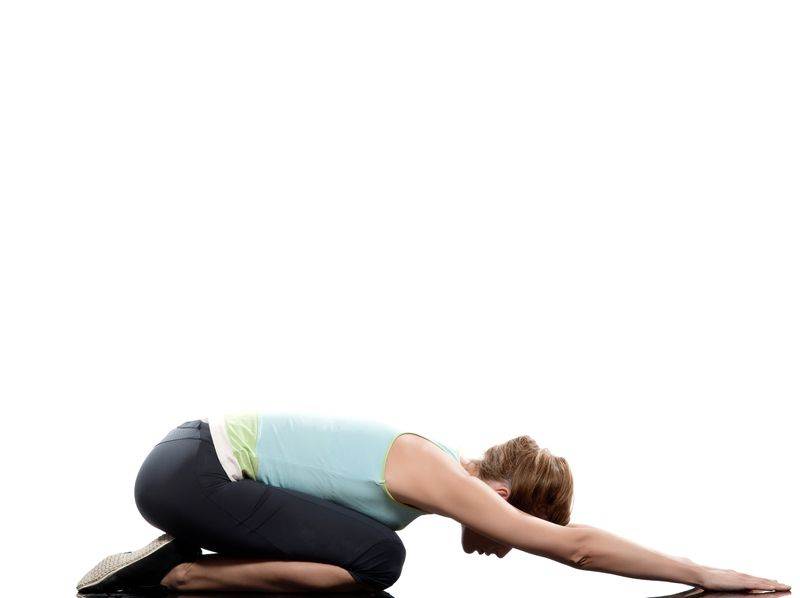
Child’s Pose is a yoga stretch:
- Kneel on the floor with your big toes touching.
- Sit back on your heels, then bend forward.
- Extend your arms forward, touching the floor.
- Rest your forehead on the ground.
- Relax and breathe deeply, stretching your back and hips.
Child’s Pose is a resting position in yoga, promoting relaxation and gentle stretching of the spine, hips, and thighs.
#2 Lunge Pose: You need to stretch the hip flexor muscles (psoas muscles)
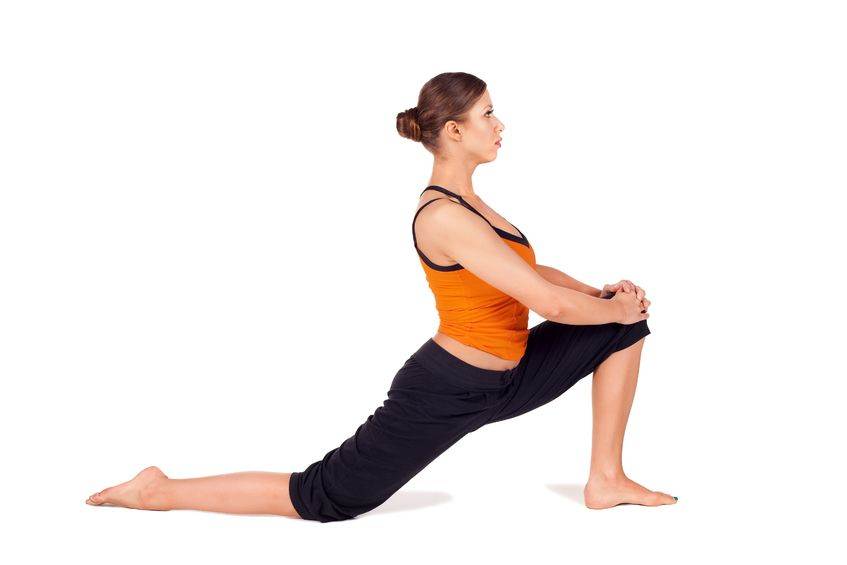
The lunge stretch is a simple and effective stretching exercise that targets the muscles in your legs and hips. Here’s how to do it:
- Starting Position: Begin by standing upright with your feet together.
- Step Forward: Take a step forward with one leg, extending it in front of you. This will be your leading leg.
- Lower Your Body: Bend both knees to lower your body towards the ground. Your leading knee should be at a 90-degree angle, with your thigh parallel to the floor, and your other knee should hover just above the ground.
- Keep Your Back Straight: Ensure your back remains straight and your chest is upright. Avoid leaning too far forward or backwards.
- Stretch: You should feel a stretch in the hip flexors and quadriceps of the trailing leg and a gentle stretch in the hamstrings and glutes of the leading leg.
- Hold: Hold this position for about 15-30 seconds, feeling the stretch in your leg muscles. Keep breathing steadily.
- Switch Legs: Release the stretch and step your leading leg back to the starting position. Then, repeat the lunge stretch with your other leg.
- Repeat: Perform this stretch for both legs for a few repetitions to improve flexibility and mobility in your lower body.
#3 The Chair Squat To Strengthen Your Gluteus Maximus: Posture Corrector
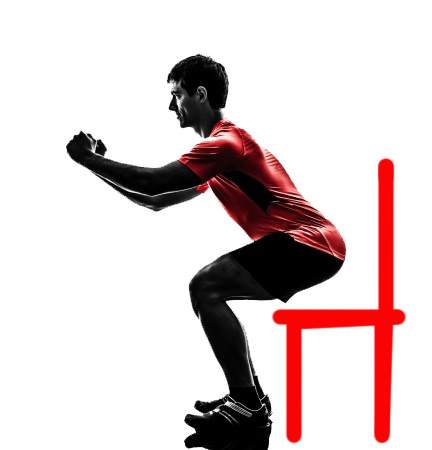
- Starting Position:
- Stand with your back facing the chair.
- Keep your feet shoulder-width apart, with a slight outward turn.
- Maintain a neutral spine; avoid arching your lower back.
- Execution:
- Lower yourself down towards the chair by bending your knees.
- Aim to touch the chair briefly with your hips without fully sitting down.
- Ensure your knees are in line with your toes as you lower.
- Return to Standing:
- Push through your heels to return to the standing position.
- Engage your core and maintain proper posture throughout the movement.
- Repetitions and Sets:
- Perform 10 chair squats in a controlled manner.
- Complete 3 sets of 10 repetitions each, with short breaks in between.
Tips:
- Focus on the controlled descent and ascent to engage your leg muscles effectively.
- Keep your chest lifted and shoulders relaxed.
- Ensure your knees do not extend beyond your toes during the squat.
- If you experience any discomfort or pain, adjust the depth of the squat or consult with a fitness professional.
#4 Front Planks: Posture Corrector
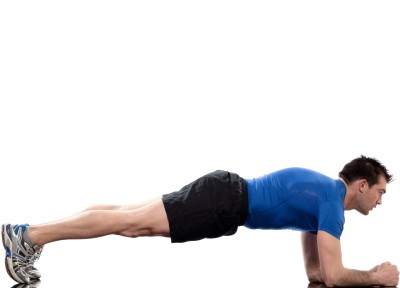
The front plank is a core-strengthening exercise:
- Start in a push-up position but with your weight on your forearms.
- Keep your body in a straight line from head to heels.
- Engage your core muscles and hold this position for as long as you can.
- Breathe steadily and maintain proper alignment.
- Aim to increase your hold time as you build core strength.
The front plank helps improve core stability and is a key exercise for building a strong abdominal and lower back muscles.
Tell us what you think in the comments below and like us on Facebook. I will answer all questions in the comments section here at this downtown Toronto Chiropractic clinic.
Related Categories: Posture, Shoulder
Dr. Ken, has been recognized as the Best Toronto Chiropractor in 2024, 2023, and 2018, here in downtown Toronto. As a sports chiropractor, he excels in treating a wide range of conditions including concussions, temporomandibular joint disorders (TMJ), sports-related injuries, and spinal issues. Beyond his clinical skills, Dr. Ken is an accomplished athlete, having represented Ontario in the Canadian Judo Championships and completed the Toronto Marathon on two occasions. He employs the innovative C3 Program to provide targeted and effective care to his patients, ensuring a holistic approach to their well-being and athletic performance.