Bodi Empowerment
Back Pain //
Lumbar Degenerative Disc Disease Exercises: A Guide for Relief

Please follow and like us:
Living with lumbar degenerative disc disease or Lumbar DDD can be challenging, and the prospect of surgery might not be the ideal solution for everyone. Fortunately, there’s a proactive and empowering alternative—engaging in a targeted regimen of degenerative disc disease exercises. In this blog post, we’ll explore the world of these exercises, shedding light on what degenerative disc disease is, and sharing a range of effective exercises that can bring much-needed relief to your lower back.
Understanding Lumbar Degenerative Disc Disease:
Degenerative disc disease is a common condition characterized by the gradual thinning of the discs between your vertebrae. Remarkably, this process begins as early as 7 years old, but tangible changes in X-rays typically emerge around your 40s. As blood vessels supplying these discs diminish, nutrient absorption becomes less efficient, leading to cell starvation and eventual disc degeneration.
Part 2 Degenerative Disc Disease: Best Exercises To Help Your Lower Back Pain – Spondylosis
Lumbar Degenerative Disc Disease Exercises:
To combat the associated pain, a well-rounded routine of Stretching, Strengthening & Stability, and Aerobic exercises can make a substantial difference.
Bird Dog Exercise for Lumbar Degenerative Disc Disease
The Bird Dog exercise is a versatile movement that can be incorporated into your warm-up routine, as part of a core workout, or even in a full-body workout routine.
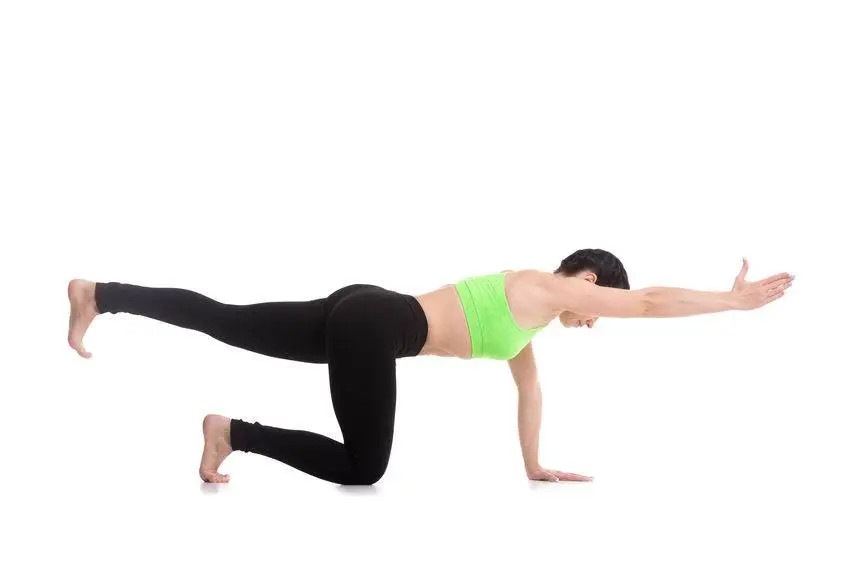
Starting Position:
- Begin in a tabletop position on a mat, with wrists under shoulders and knees under hips.
Neutral Spine:
- Engage your core, drawing your navel to your spine, and keep your back neutral.
Lift Arm and Leg:
- Extend your right arm forward and your left leg back, both parallel to the ground.
Maintain Balance:
- Form a straight line from fingertips to toes, keeping hips level.
Hold Position:
- Hold briefly, focusing on balance and core engagement.
Return and Switch:
- Return to the starting position slowly, then switch to extend the left arm and right leg.
Tips:
- Keep core engaged and movements controlled.
- Avoid hip or shoulder rotation.
- Breathe: Inhale to extend, exhale to return.
Repetitions:
- Do 2-3 sets of 10-12 reps per side, adjusting for fitness level.
Chair Squats For Lumbar Degenerative Disk Disease
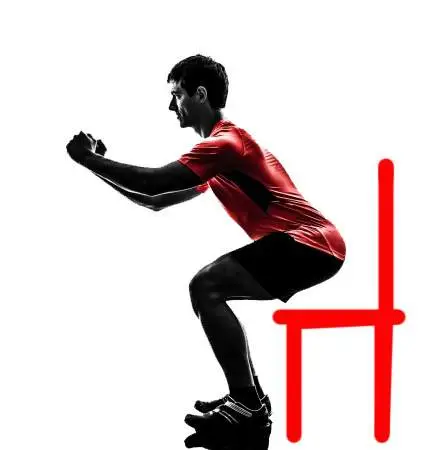
Starting Position:
- Stand in front of a stable chair, feet shoulder-width apart, toes slightly turned out for balance.
Hand Placement:
- Extend arms at shoulder height to help balance.
Squat Movement:
- Push hips back as if sitting down, keeping chest up and spine neutral.
Lowering Down:
- Bend knees to lower towards the chair until thighs are parallel to the floor or buttocks lightly touch the chair.
Knee Alignment:
- Keep knees in line with toes, avoiding inward collapse.
Rising Up:
- Press through heels to stand, engaging quadriceps and glutes.
Repetitions:
- Perform 2-3 sets of 10-15 reps, maintaining form. Adjust reps based on fitness level. Increase difficulty by using a lower chair or adding resistance over time.
Tips:
- Move slowly and control the squat.
- Inhale while lowering, exhale when rising.
- Start with a higher chair if needed and progress to a lower one.
Side Plank For Lumbar Degenerative Disc Disease

- Starting Position:
- Begin by lying on your side on a mat. Position your elbow directly beneath your shoulder, and stack your feet on top of each other.
- Elbow and Forearm Placement:
- Place your bottom elbow directly beneath your shoulder, making sure your forearm is resting on the mat. Your elbow should form a 90-degree angle.
- Body Alignment:
- Engage your core muscles by drawing your navel toward your spine. Your body should form a straight line from your head to your feet.
- Lift Your Hips:
- Lift your hips off the mat, keeping your body in a straight line. Your shoulders, hips, and ankles should be in alignment. Focus on lifting through the hips rather than letting them sag.
- Arm Placement:
- If you feel stable, you can extend your top arm straight up toward the ceiling, creating a straight line from your fingertips to your feet. Alternatively, you can place your hand on your hip for added stability.
- Hold the Position:
- Hold the side plank position for as long as you can maintain proper form. Aim for 15-30 seconds initially and gradually increase the duration as your strength improves.
- Lowering Down:
- Gently lower your hips back to the mat with control, returning to the starting position.
- Switch Sides:
- Repeat the exercise on the opposite side by turning over and balancing on your other elbow.
- Back Support Post Back Support:
Repetitions and Sets:
- Start with 2-3 sets on each side, holding the position for the desired duration. As your strength increases, you can extend the time spent in the side plank or add more sets.
Supine Bridge For Lumbar Degenerative Disc Disease

- Starting Position:
- Lie on your back on a mat or a comfortable surface with your knees bent and feet flat on the floor. Ensure your feet are hip-width apart.
- Arm Placement:
- Place your arms by your sides, with palms facing down. Your arms should be straight and in line with your body.
- Pelvic Tilt:
- Engage your core muscles by gently pulling your belly button towards your spine. This action will flatten your lower back against the mat.
- Lift Hips:
- Inhale and, while exhaling, press through your heels and squeeze your glutes to lift your hips towards the ceiling. Your body should form a straight line from your shoulders to your knees at the top of the movement.
- Full Extension:
- Continue lifting your hips until your thighs and torso are in line with each other, avoiding over-arching your lower back. Focus on creating a straight line, engaging your glutes throughout the movement.
- Hold Position:
- Hold the position at the top for a moment, ensuring you maintain tension in your glutes and core.
Aerobic Exercises:
- Swimming: Ideal for most people, with breaststroke being a recommended stroke. Aim for 2-5 sessions per week for 20 minutes.
- Walking: A brisk walk for 20 minutes daily is beneficial for those experiencing soreness. Adjust intensity based on pain levels.
- Cycling: Use a stationary bike initially to minimize impact. Maintain the arch in your lower back to protect the disc.
Degenerative Disc Disease Treatment:
Beyond exercises, consider chiropractic treatments for effective relief.
- Manual Therapy: Involves mobilization and manipulation to enhance joint and muscle motion.
- Myofascial Release Technique: Targets muscle tension to relieve associated pain.
- Postural Correction: Focuses on stretching tight muscles and strengthening weak ones to improve posture.
- Pain Treatments: Acupuncture, Laser, and Shockwave therapy help alleviate pain in spinal joints and muscles.
Conclusion:
While you can’t halt the degenerative process, incorporating these degenerative disc disease exercises and seeking chiropractic treatments can significantly improve your quality of life. Remember, the key is to stay consistent and consult with healthcare professionals for personalized guidance. Reclaim your comfort with these empowering exercises tailored to your journey with degenerative disc disease.
Tell us who you think is the best Toronto Chiropractor in the comments section below. Also, tell us what you think on Facebook.
Please follow and like us:


Dr. Ken, has been recognized as the Best Toronto Chiropractor in 2024, 2023, and 2018, here in downtown Toronto. As a sports chiropractor, he excels in treating a wide range of conditions including concussions, temporomandibular joint disorders (TMJ), sports-related injuries, and spinal issues. Beyond his clinical skills, Dr. Ken is an accomplished athlete, having represented Ontario in the Canadian Judo Championships and completed the Toronto Marathon on two occasions. He employs the innovative C3 Program to provide targeted and effective care to his patients, ensuring a holistic approach to their well-being and athletic performance.